
How to Create Free Educational Games with AI Using the uPresenter Plugin
Learn how to install the uPresenter Plugin with Claude, write effective prompts, and create free interactive educational games in minutes to enhance your lessons.
 Linh Huong Ho6 min read
Instead of relying solely on slides to deliver information, teachers can turn lesson content into interactive games that encourage learners to participate, practice, and retain knowledge more effectively.
With the uPresenter Plugin, you can use AI tools such as Claude or ChatGPT Codex to create and customize educational games using natural language prompts - completely free. From quizzes and vocabulary games to themed challenges, you can turn your ideas into interactive learning activities tailored to your teaching objectives.
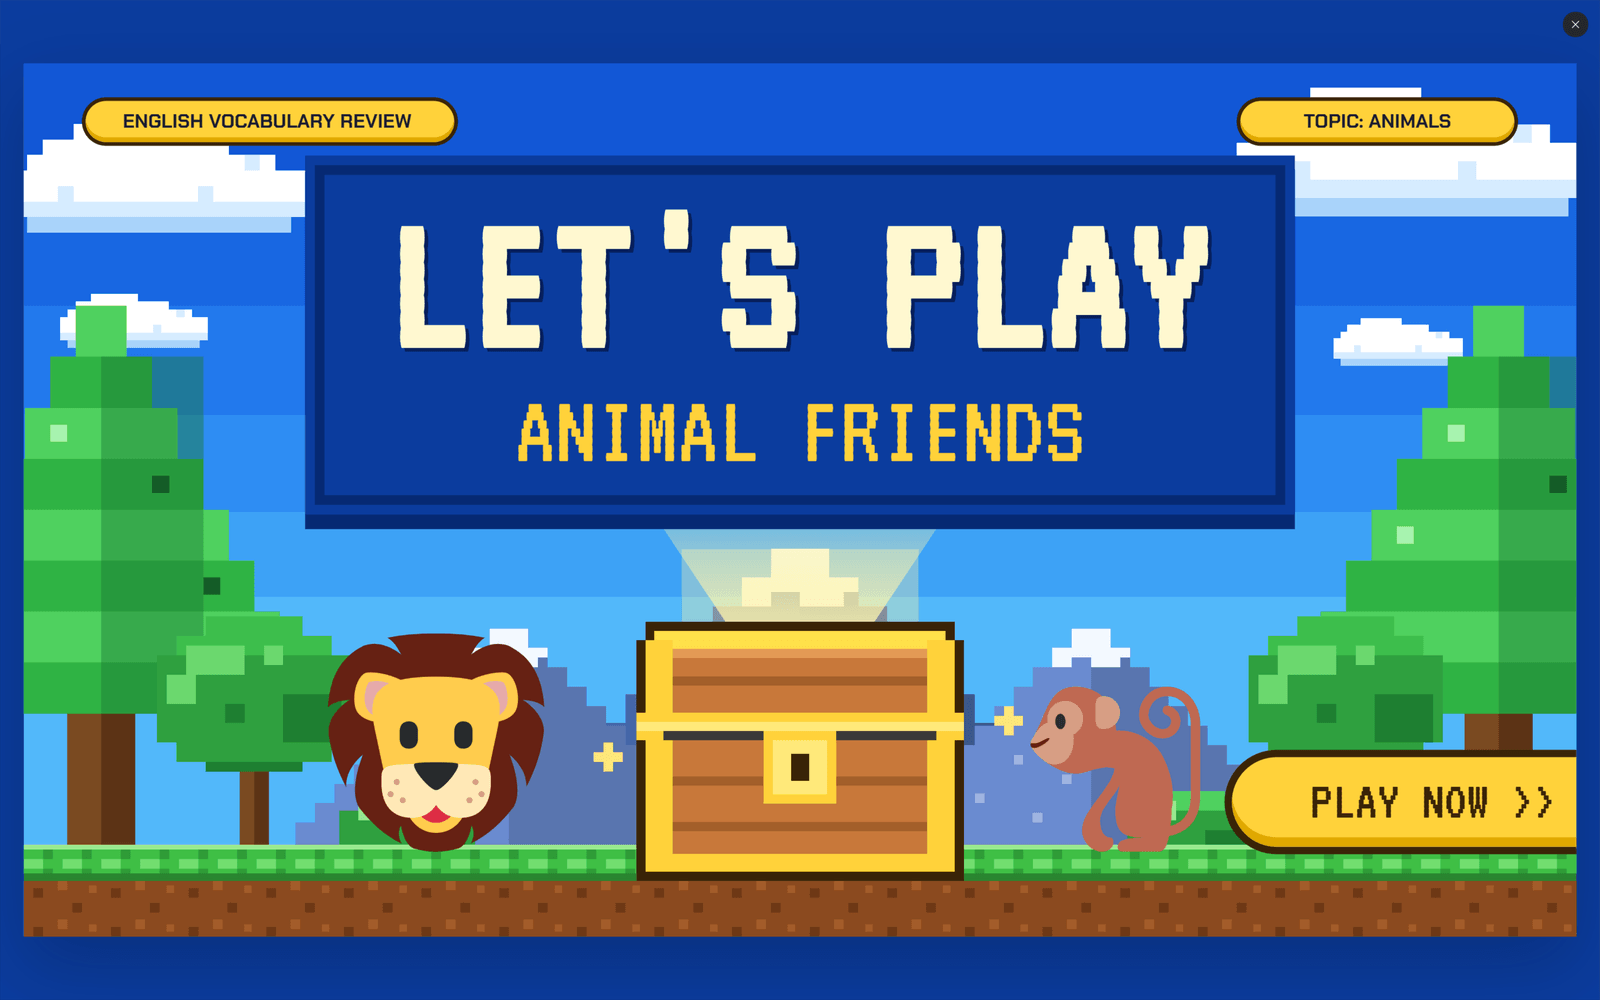
An interactive educational game created with AI using the uPresenter Plugin.
What Types of Educational Games Can You Create with AI?
Depending on your lesson objectives, you can ask AI to build different types of educational games, including:
- Quiz Games: Learners answer questions to review concepts, test their knowledge, and reinforce what they have just learned.
- Vocabulary Games: Learners identify images, match words with their meanings, or choose the correct answers to practice foreign-language vocabulary.
- Puzzle and Challenge Games: Learners complete a series of questions or tasks to unlock the next level.
- Themed Games: Create games around themes such as Halloween, animals, science, or history to make learning activities more engaging and relevant.
How to Create Educational Games with AI Using the uPresenter Plugin and Claude
The uPresenter Plugin supports different AI environments. In this tutorial, we will walk through the process using Claude. If you prefer ChatGPT Codex, refer to the corresponding setup instructions in How to Connect uPresenter to Claude or Codex
Step 1: Install and Connect the uPresenter Plugin to Claude
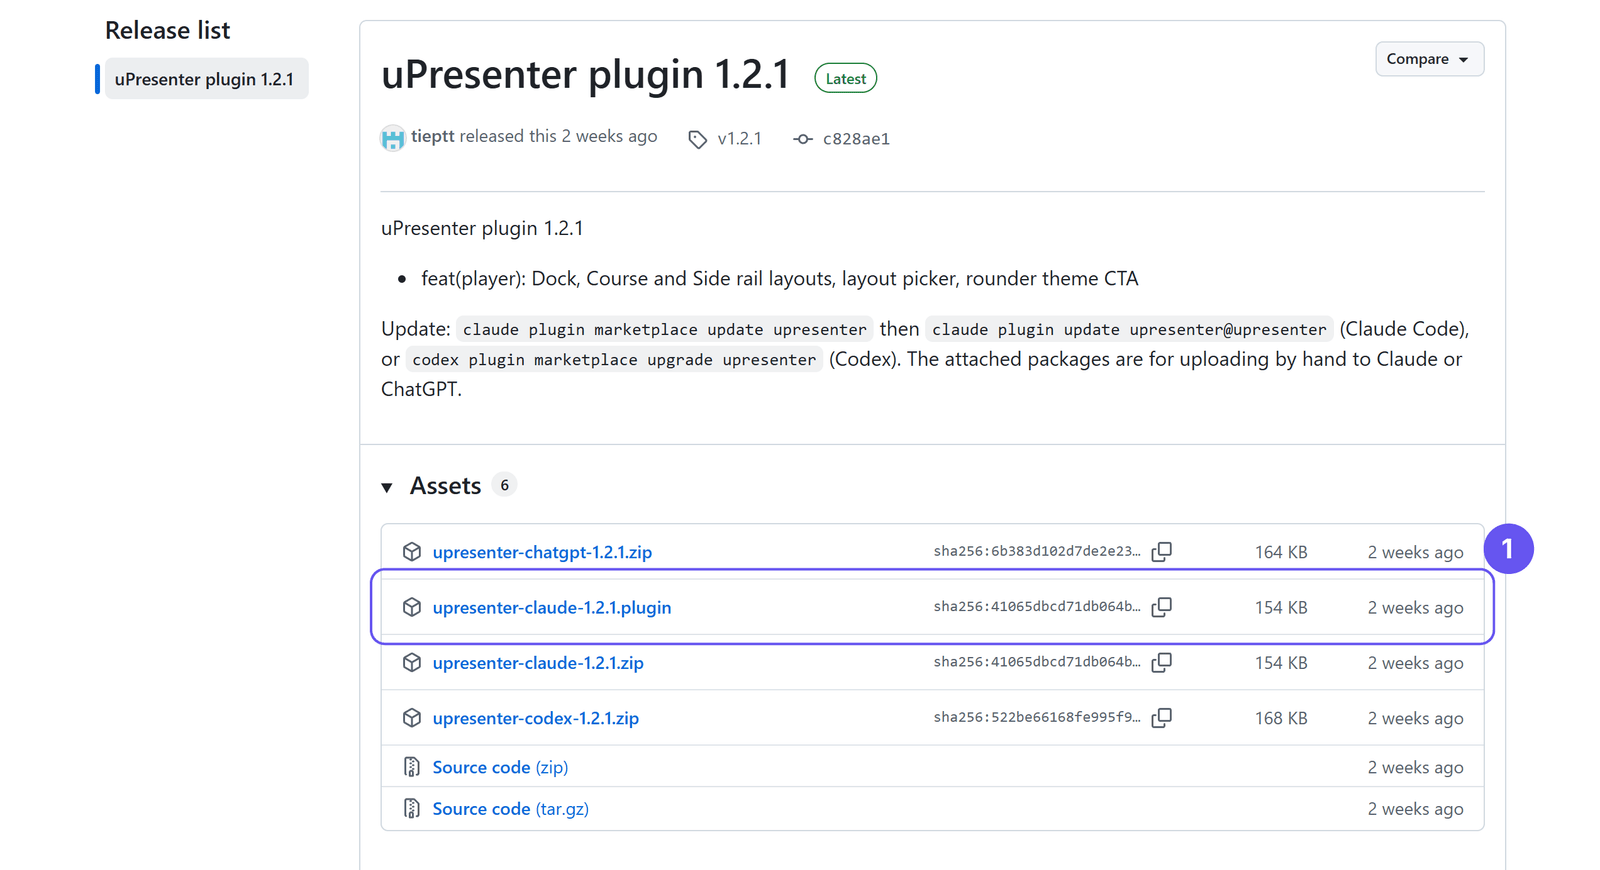
1.1. Download the uPresenter Plugin
Visit the uPresenter Plugin and download the plugin package for Claude from the Assets section.
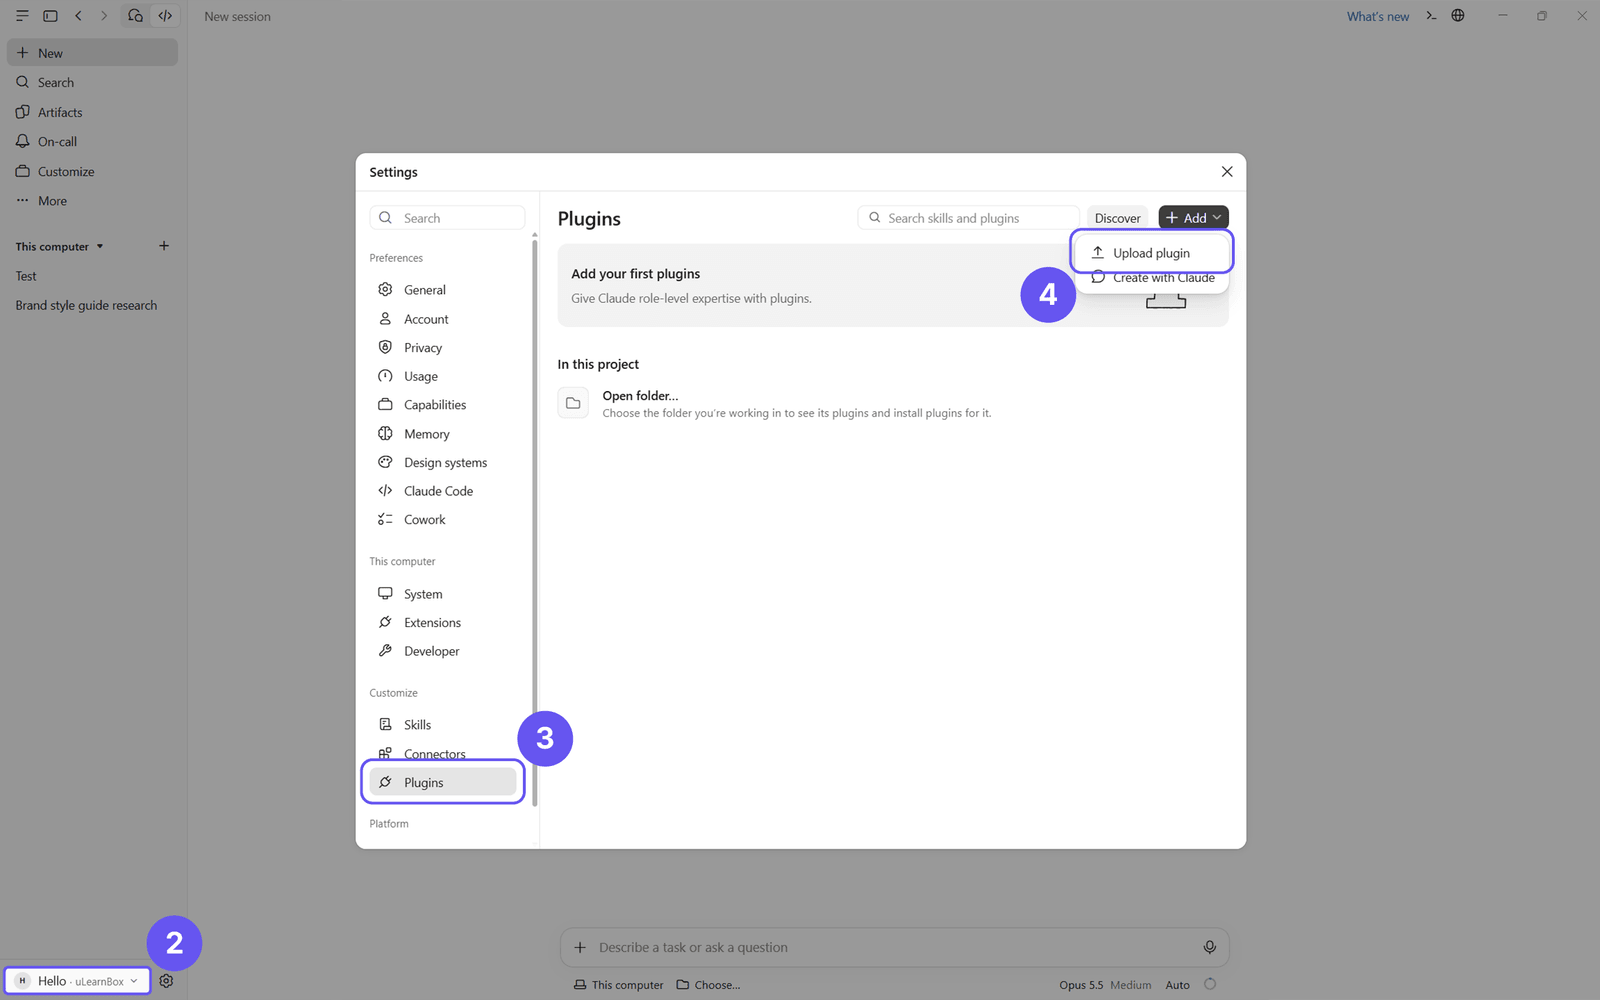
1.2. Add the Plugin to Claude
Open Claude → go to Settings → select Plugins → click Add → choose Upload plugin and upload the file you just downloaded.
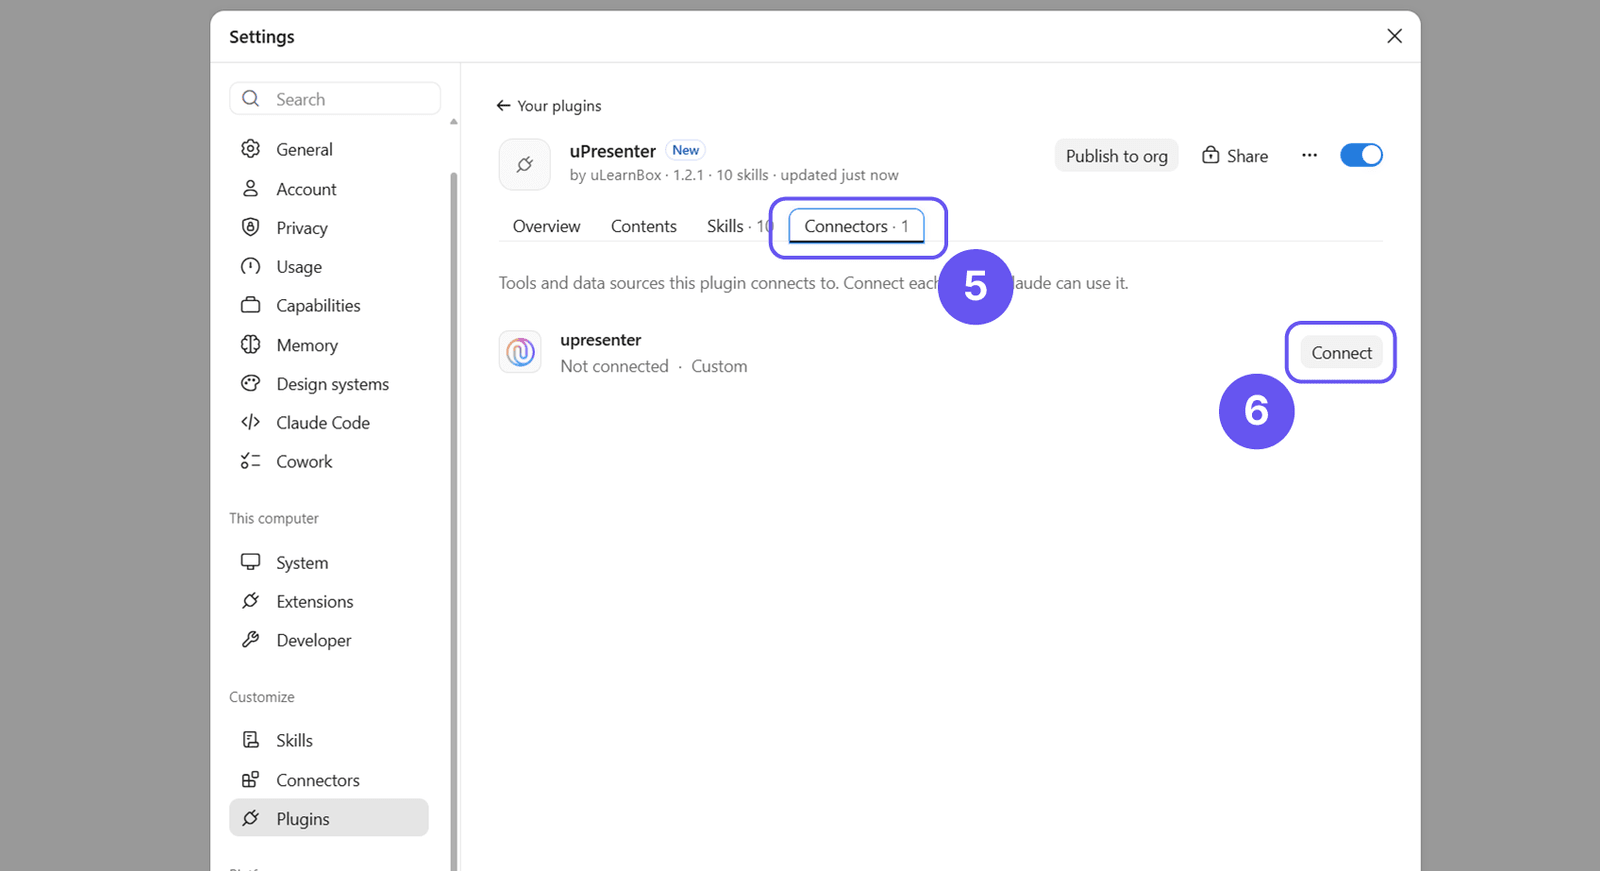
1.3. Connect Your uPresenter Account
Once the plugin is installed, open Connectors in Claude, find uPresenter, and click Connect to start the connection process.
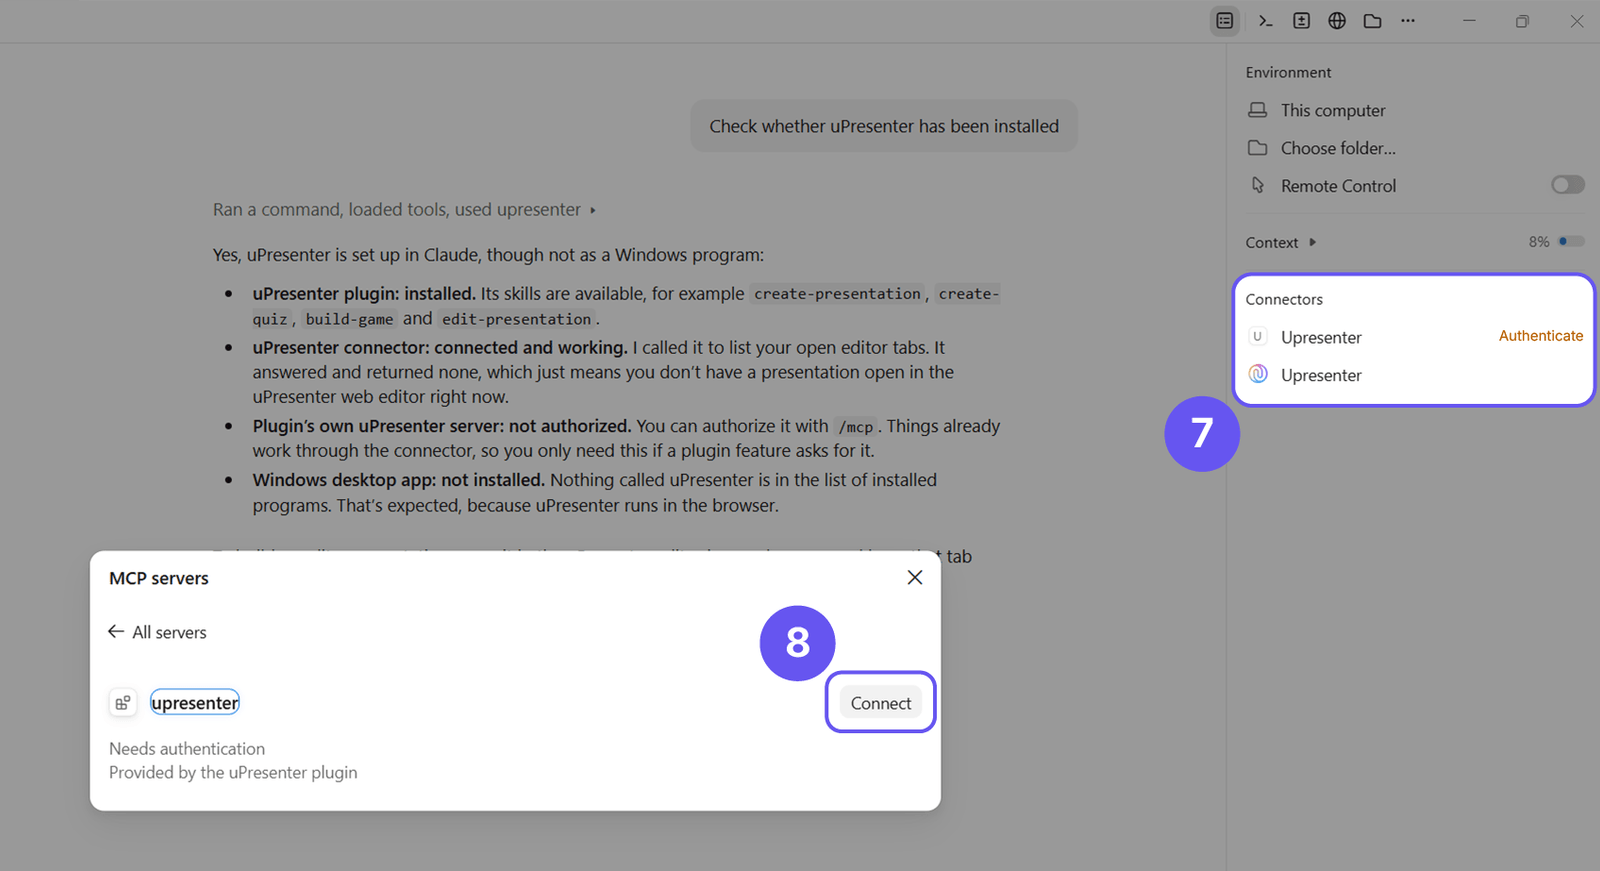
Select Allow and follow the on-screen instructions to authorize your account.
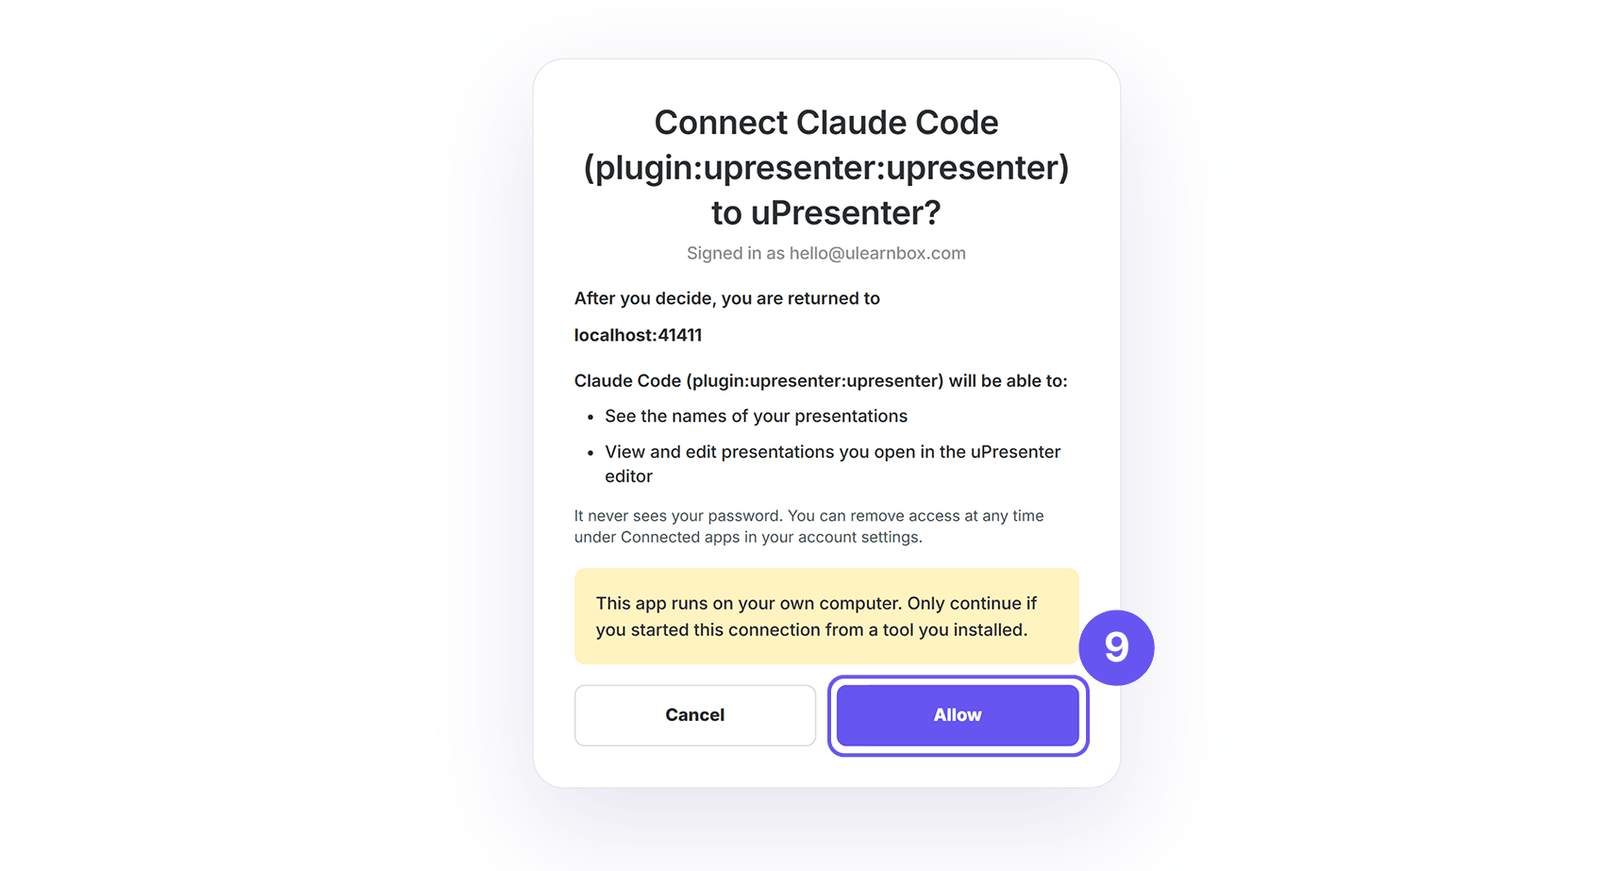
Once you see the successful connection notification, you are ready to use the plugin.
You can also type /mcp in Claude's chat box to check your connected tools. If uPresenter appears in the list with a connected status, the setup is complete.
Step 2: Write a Prompt Describing the Game You Want to Create
After connecting successfully, enter a prompt in Claude to describe your idea and request an educational game.
To help AI understand your requirements, your prompt should clearly specify:
- Target learners: Their age, grade level, or proficiency level.
- Learning objectives: The knowledge or skills learners should practice.
- Gameplay: The tasks learners need to complete and the conditions for finishing the game.
- Interactions: Buttons, answer choices, feedback, and how learners move between questions or levels.
- Visual design: The style, colors, and layout appropriate for the target audience.
- Validation requirements: Review the content, answers, and interaction flow before finalizing the game.
For example, if you want to create an English vocabulary game about animals for students, you can use the following prompt:
Sample Prompt: Create an English Vocabulary Game About Animals
''Create an interactive educational game in uPresenter for students to review English vocabulary on the topic of Animals. The game should include 10 multiple-choice questions. Each question should display an image or a suitable visual clue related to the vocabulary word, along with 3-4 answer options. When a player selects an answer, show whether it is correct or incorrect and provide a brief explanation when necessary. After each question, allow the player to move on to the next one. At the end of the game, display the total number of correct answers and an encouraging message. Please review the questions, answer choices, interaction flow, and overall gameplay. If you find any issues, fix them before completing the game.''
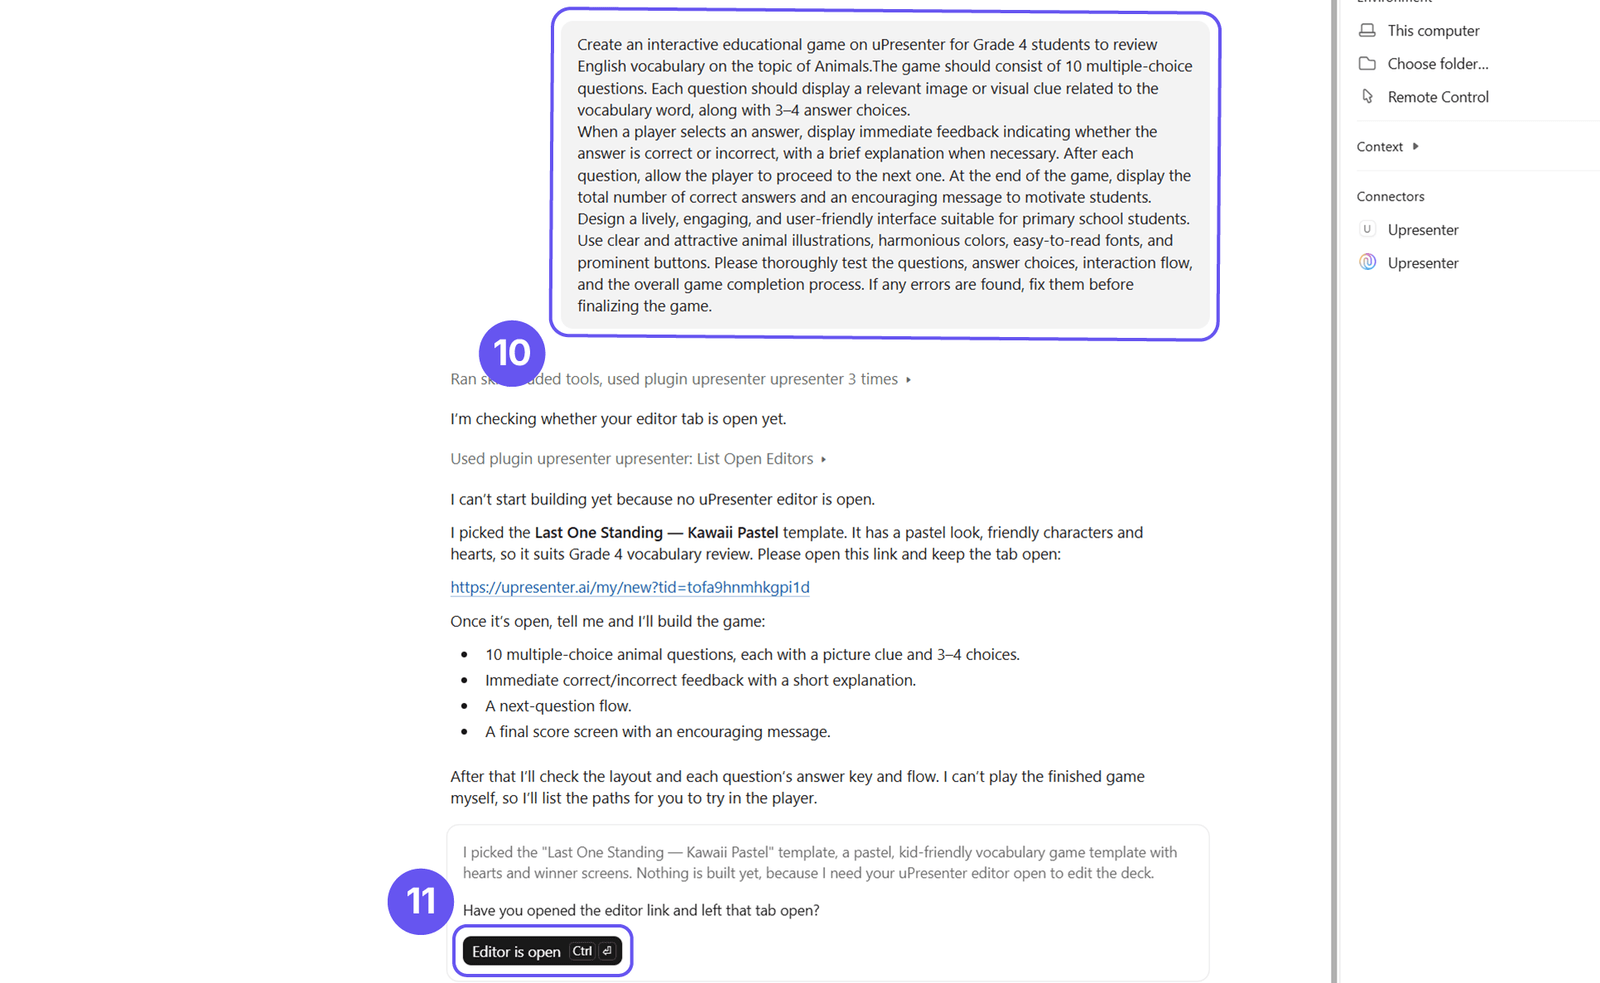
Once you submit the prompt, the AI assistant will suggest suitable templates or offer the option to start from scratch. After you make your selection, it will provide a link to create a new presentation.
Open the link and keep the uPresenter tab open. The assistant will then work on the presentation by adding slides, replacing sample content, inserting questions, and checking the result.
Step 3: Review and Customize Your Game
After the AI finishes creating the game, review the questions and answers, test the interactive buttons, and check the overall design.
You can continue prompting the AI to make changes, such as adjusting the difficulty level, adding explanations, revising the game rules, or updating the visual design to better match your learning objectives.
For example, you can use the following prompt:
''Increase the difficulty of the last three questions and add brief explanations for incorrect answers.''
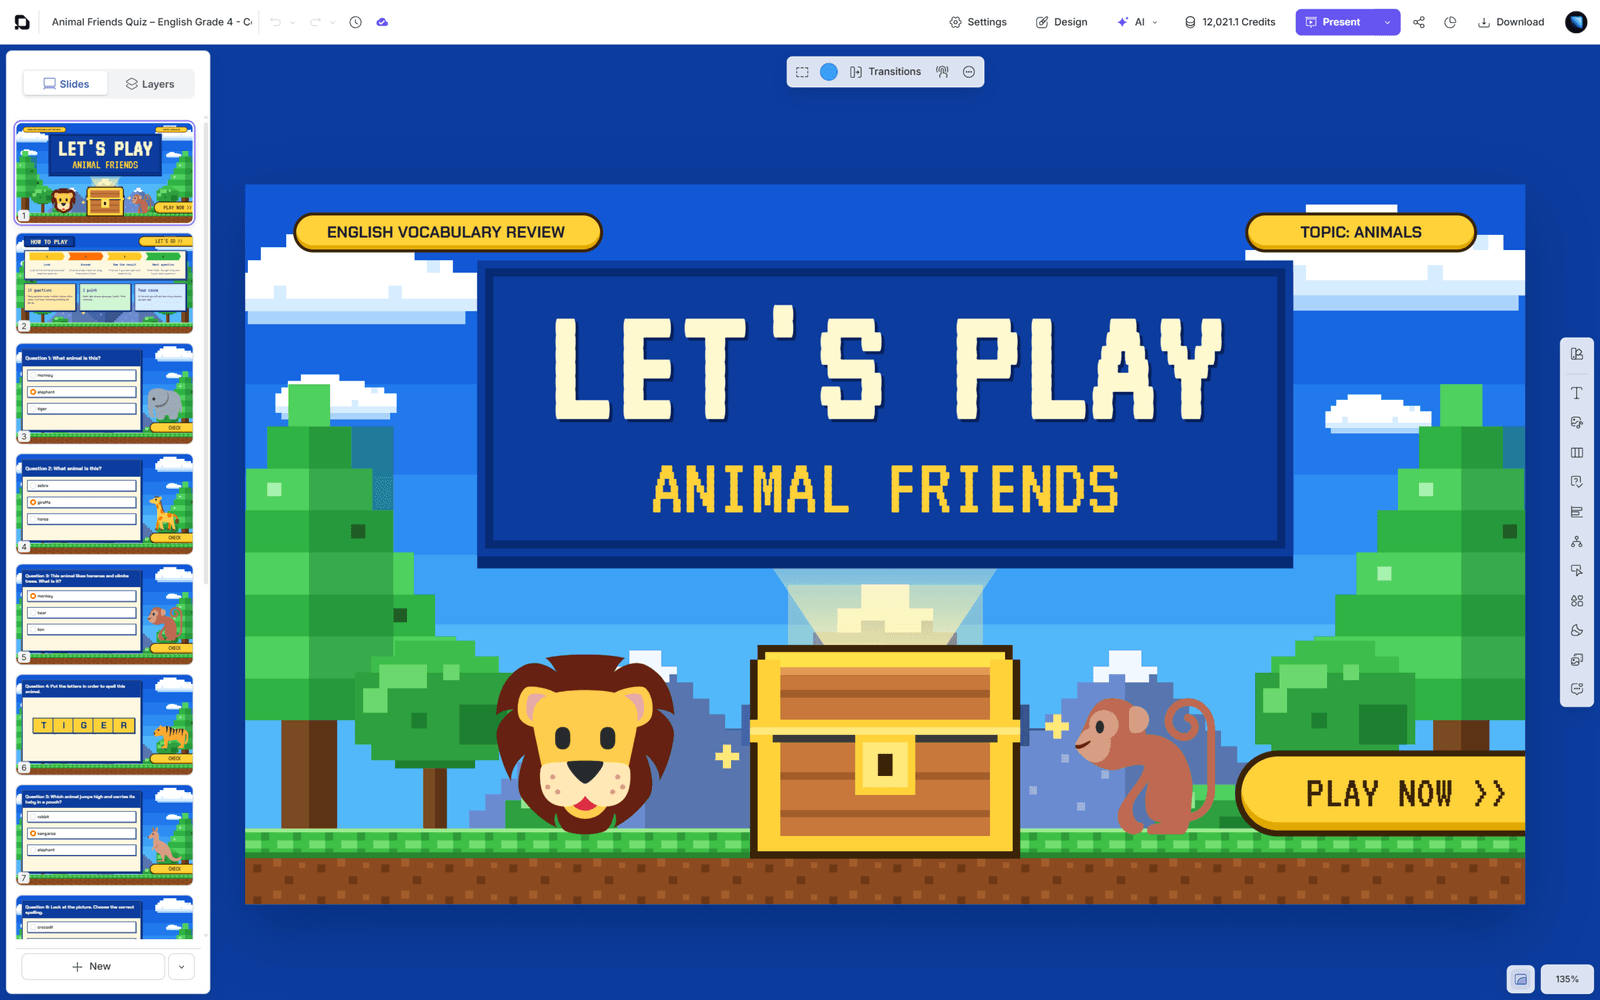
The creation process does not have to end with the first prompt. Before using the game in class or sharing it with learners, make sure the content is appropriate for the lesson and that all interactions work as expected.
Real-Life Example: Halloween Game "Boo's Candy Hunt"
"Boo's Candy Hunt" is a themed game created using AI and the uPresenter Plugin. It combines a Halloween-inspired visual design with fun interactive activities, making it suitable for reviewing knowledge or kicking off a lesson during the festive season.
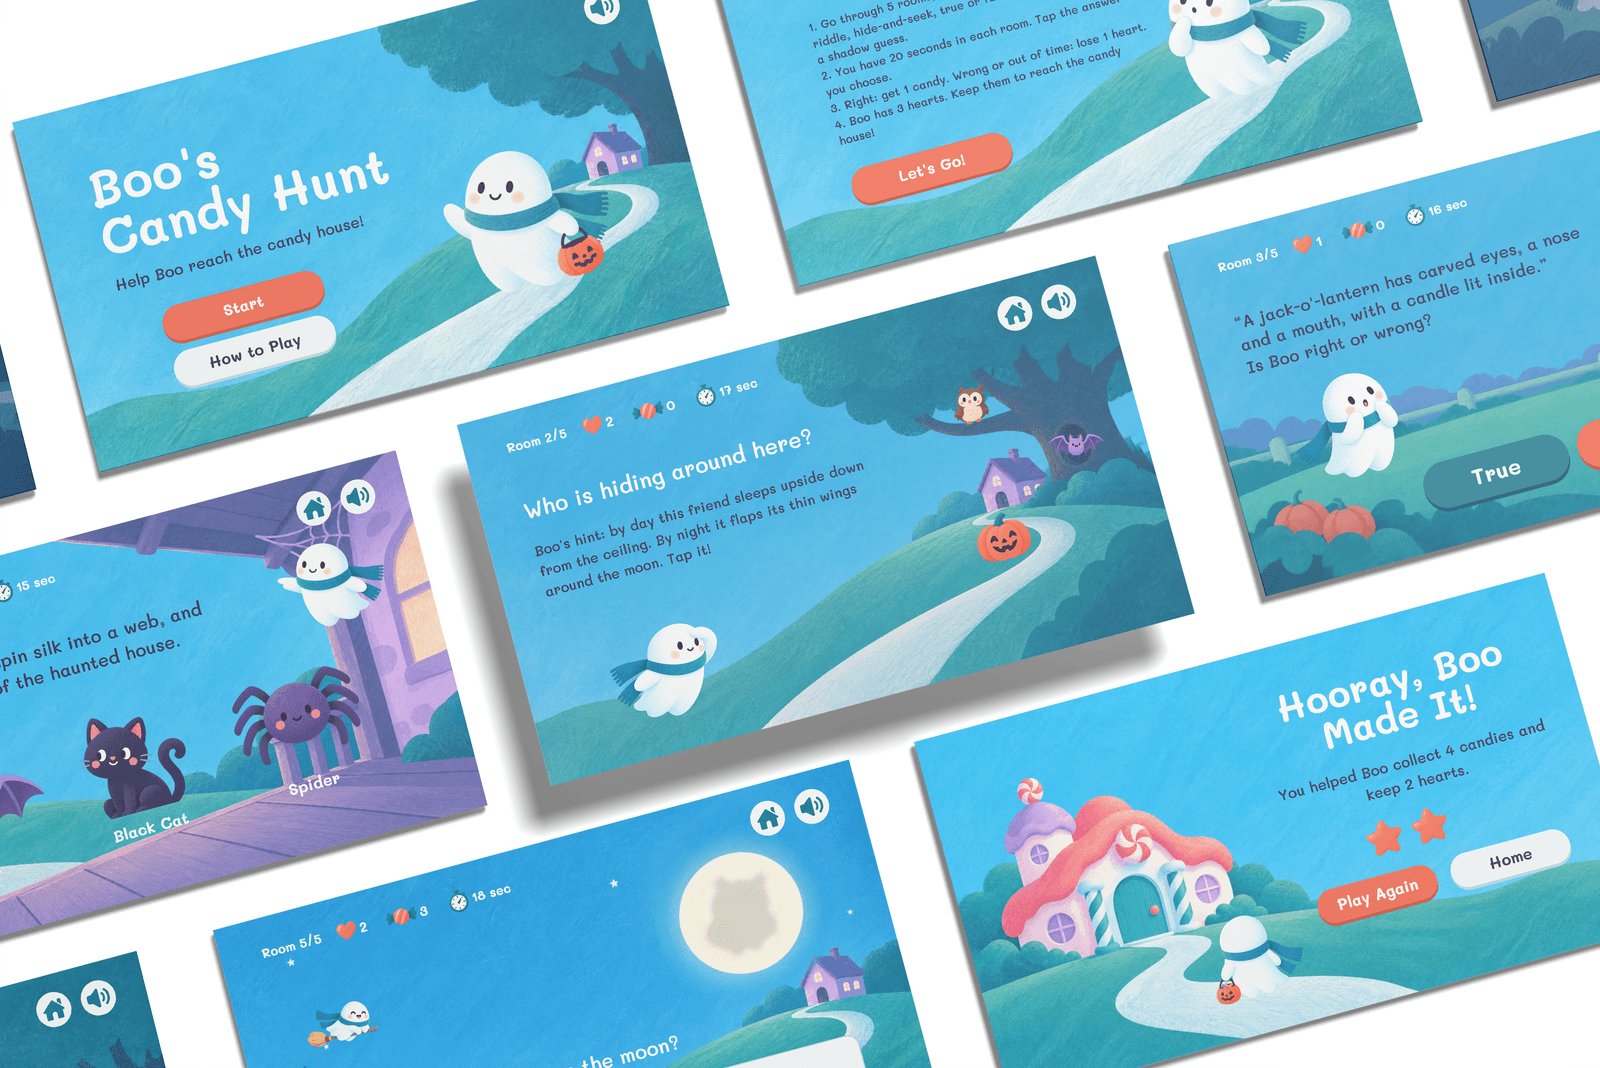
"Boo's Candy Hunt" - an educational game created with AI and the uPresenter Plugin.
Try the Boo's Candy Hunt to see how an idea can be turned into an interactive learning experience.
Inspired by this example, you can develop many other ideas, such as a treasure hunt for vocabulary review, science puzzle challenges, or a history-themed learning adventure.
Tips for Creating Educational Games with AI
To make sure your games genuinely support teaching and learning, keep the following tips in mind:
- Start with clear learning objectives: Identify the knowledge or skills learners need to review before choosing a game format.
- Choose the right game format: Short games work well for lesson warm-ups or quick reviews, while multi-task challenges can be useful for topic-based revision.
- Write specific prompts: Clearly describe the target learners, subject matter, rules, and feedback so AI can better understand your requirements.
- Focus on meaningful interactions: Each question or task should help learners practice, retain, or apply knowledge.
- Review before using: Do not assume that AI-generated content and interactions will be accurate or work perfectly on the first attempt.
AI can support the game creation process, but teachers remain responsible for selecting the content, adjusting the difficulty, and evaluating whether the game meets their teaching objectives.
Start Creating Educational Games with the uPresenter Plugin
You do not need to design every slide or build every interaction manually. With the uPresenter Plugin, simply describe your idea in natural language, and AI can help bring it to life. You can then review and customize the result to fit your teaching objectives.
From quiz games and vocabulary activities to themed challenges, you can turn lesson content into more engaging interactive learning experiences.
Start with a familiar topic from your next lesson and try creating your first educational game.
Explore uPresenter: https://upresenter.ai/vi